Hinsley Documentation
SCIM Provisioning Setup
This guide walks through configuring SCIM (System for Cross-domain Identity Management) provisioning for your Hinsley account. SCIM allows your Identity Provider (IdP) to automatically provision and deprovision user accounts in Hinsley, as well as manage group memberships. Hinsley supports SCIM 2.0 and is compatible with any SCIM 2.0-compliant Identity Provider, including Microsoft Entra ID, Okta, OneLogin, and others.
Prerequisites
- A Hinsley account on the Enterprise plan
- Admin access to your Hinsley account
- Admin access to your organization's Identity Provider
- (Recommended) SSO already configured for your account via SAML or OIDC
Overview
When SCIM provisioning is enabled:
- User creation: Your IdP automatically creates user accounts in Hinsley when users are assigned to the application.
- User updates: Changes to user profiles (name, email) in your IdP are synced to Hinsley.
- User deactivation: When a user is unassigned or deactivated in your IdP, their Hinsley account is archived (deactivated).
- Group management: Your IdP can push group memberships to Hinsley, which can optionally be used to control admin role assignments.
- SSO login restriction: When SCIM is enabled alongside SAML or OIDC, new users cannot be auto-created via SSO login. They must be provisioned through SCIM first.
Step 1: Enable SCIM Provisioning in Hinsley
- Log in to Hinsley as an account administrator.
- Navigate to Account Admin by clicking on your avatar in the top right and selecting Account Admin.
- Select the Authentication tab to access the SSO configuration pages.
- Click the SCIM tab at the top of the page.
- Click the Enable SCIM Provisioning button.
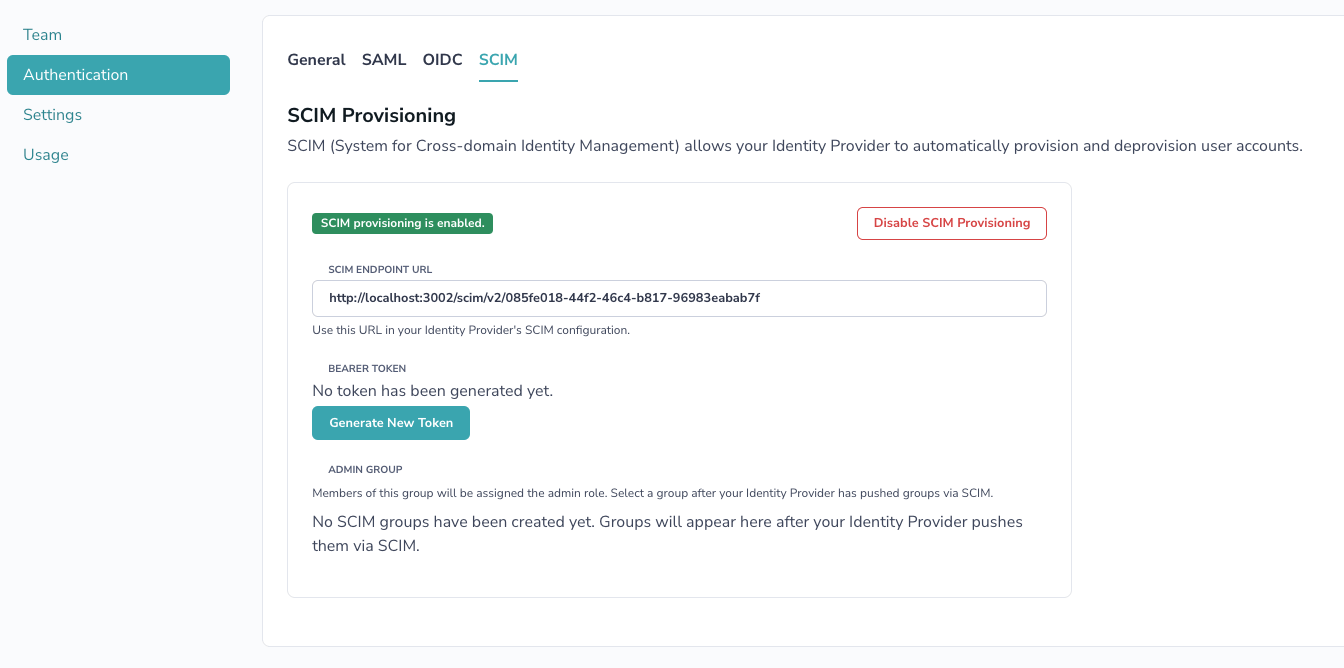
Step 2: Generate a Bearer Token
After enabling SCIM, you need to generate a bearer token that your IdP will use to authenticate with Hinsley's SCIM API.
- On the SCIM configuration page, click Generate New Token.
- A token will be displayed in a blue info box. Copy this token immediately -- it will not be shown again.
- Store the token securely. You will need it when configuring your IdP.
Step 3: Note the SCIM Endpoint URL
The SCIM configuration page displays the SCIM Endpoint URL. This is the base URL your IdP will use for all SCIM operations. It follows the format:
https://www.hinsley.ai/scim/v2/{account-uuid}Copy this URL -- you will need it when configuring your IdP.
Step 4: Configure Your Identity Provider
Microsoft Entra ID (Azure AD)
- In the Azure Portal, go to Microsoft Entra ID > Enterprise applications.
- Select the Hinsley application you created for SSO (or create a new one if you haven't set up SSO).
- Go to Provisioning > New configuration.
- In the Admin Credentials section, paste the SCIM Endpoint URL from Hinsley as the Tenant URL, and paste the bearer token as the Secret Token.
- Click Test Connection to verify Hinsley accepts the credentials.
- Click Create
In Attribute Mapping, ensure the following mappings are set for Users:
| Microsoft Entra Attribute | SCIM Attribute |
|---|---|
userPrincipalName (or mail) |
userName |
givenName |
name.givenName |
surname |
name.familyName |
mail |
emails[type eq "work"].value |
Switch([IsSoftDeleted], , "False", "True", "True", "False") |
active |
objectId |
externalId |
For Groups (if you want to use group-based role management):
| Microsoft Entra Attribute | SCIM Attribute |
|---|---|
displayName |
displayName |
objectId |
externalId |
- Under Users and groups, select the users and groups you want to provision.
- Go back to Overview and click Start provisioning.
Okta
- In the Okta admin console, navigate to your Hinsley application.
- Go to the Provisioning tab > Configure API Integration.
- Check Enable API Integration.
- Set the SCIM connector base URL to the SCIM Endpoint URL from Hinsley, and the API Token to the bearer token.
- Click Test API Credentials to verify connectivity.
- Click Save.
- Under Provisioning > To App, enable Create Users, Update User Attributes, and Deactivate Users.
- Configure the attribute mappings to match Hinsley's expected SCIM schema.
- Assign users and/or groups to the application under the Assignments tab.
Other SCIM 2.0 Providers
Consult your IdP's documentation for configuring a custom SCIM integration. You will need:
| Setting | Value |
|---|---|
| SCIM Base URL | The SCIM Endpoint URL from the Hinsley SCIM configuration page |
| Authentication Method | Bearer Token (HTTP Authorization header) |
| Bearer Token | The token generated in Hinsley |
Hinsley's SCIM implementation supports the following endpoints:
| Endpoint | Methods | Description |
|---|---|---|
/Users |
GET, POST | List and create users |
/Users/:id |
GET, PUT, PATCH, DELETE | Read, replace, update, and deactivate individual users |
/Groups |
GET, POST | List and create groups |
/Groups/:id |
GET, PUT, PATCH, DELETE | Read, replace, update, and delete individual groups |
SCIM User Attributes
| SCIM Attribute | Hinsley Field | Description |
|---|---|---|
userName |
The user's email address (used as the username) | |
name.givenName |
First Name | The user's first name |
name.familyName |
Last Name | The user's last name |
emails[type eq "work"].value |
The user's work email | |
externalId |
SCIM External ID | A unique identifier from your IdP |
active |
Archived status | When set to false, the user is archived in Hinsley |
User Provisioning Behavior
When your IdP provisions a new user through SCIM:
- The user account is created in Hinsley and immediately confirmed (no email verification needed).
- If SAML is required for the account, the user is automatically set to authenticate via SAML.
- If OIDC is required for the account, the user is automatically set to authenticate via OIDC.
- Otherwise, a secure random password is generated (the user would need to use "Forgot Password" to set their own if password login is needed).
- The user counts toward the account's seat limit. If the limit is reached, provisioning will fail with a 409 Conflict response.
User Deprovisioning Behavior
When your IdP deprovisions a user (e.g., unassigns them from the application or sets active to false):
- The user is archived in Hinsley (soft-deleted). They will no longer be able to log in or access any Hinsley resources.
- Archived users do not count toward the account's seat limit.
- The user's data (research questions, forecasts, etc.) is preserved and remains accessible to other account members.
Group Management
Hinsley supports SCIM group provisioning. Groups pushed by your IdP appear on the SCIM configuration page once they are synced.
Admin Group Designation
You can designate one SCIM group as the Admin Group in Hinsley. Members of this group will automatically be assigned the admin role in your Hinsley account. To configure:
- After your IdP has pushed groups via SCIM, go to the SCIM tab on the Authentication page.
- In the Admin Group section, select the group from the dropdown that should map to the Hinsley admin role.
- Click Save.
When the admin group is configured:
- Users added to that group in your IdP will be promoted to admin in Hinsley on the next SCIM sync.
- Users removed from that group will be demoted to the Analyst role.
- Team member roles on the Hinsley team management page will show a tooltip indicating that roles are managed via SCIM.
Disabling SCIM
To disable SCIM provisioning:
- Navigate to the SCIM tab on the Authentication page.
- Click Disable SCIM Provisioning and confirm the action.
When SCIM is disabled:
- The SCIM bearer token is permanently deleted.
- All SCIM groups and group memberships are removed.
- SCIM external IDs are cleared from user records.
- The account creator is promoted to admin if no admins remain after the SCIM groups are removed.
- User accounts themselves are not deleted or archived -- they remain active with their current authentication method.
Your IdP will no longer be able to provision or deprovision users until SCIM is re-enabled and a new token is generated.